.png?height=120&name=APP%20ICON%20(1).png)
How to configure and run the Project Payroll Report on HRLocker
The project payroll report is intended to be used as a simplified payroll report that uses contracted hours as the basis for payroll, and two projects to add additional hours or deduct hours during a payroll period.
To access the Project Payroll Report, you must have Payroll enabled for your company and you must be a Payroll Manager
To enable Payroll, you need to contact HRLocker support and we will discuss how to activate this for your company
Once Payroll is enabled, you can make a manager or admin a 'Payroll Manager' by completing the steps below
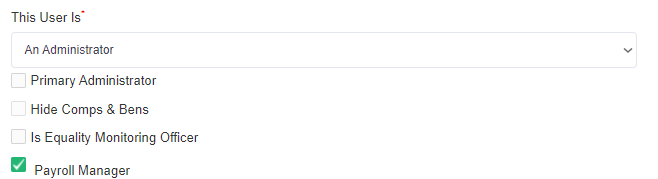
For Admins
Locate the user in the Directory and click on their name.
In their 'Summary' tab, where it says 'This User is an Administrator' tick the box to enable Payroll Manager. Note, you cannot have 'Hide Comps and Bens' selected if you want the manager to be a payroll manager.
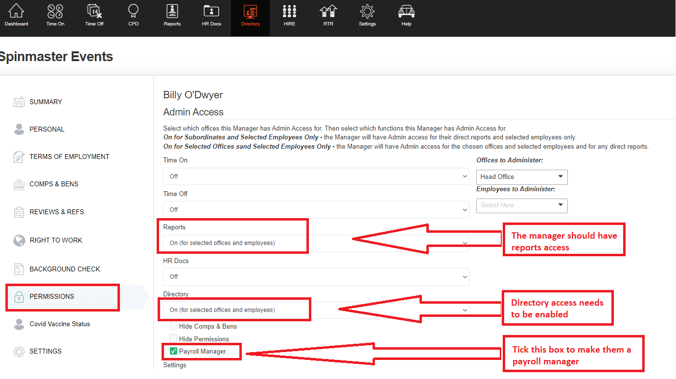
For Managers
Locate the user in the Directory and click on their name.
In their 'Permissions' tab, they need to be granted access to the directory. If this is granted, there is an option to make them a payroll manager. Note, you cannot have 'Hide Comps and Bens' selected if you want the manager to be a payroll manager.
How to set up Employees on HRLocker to use this report
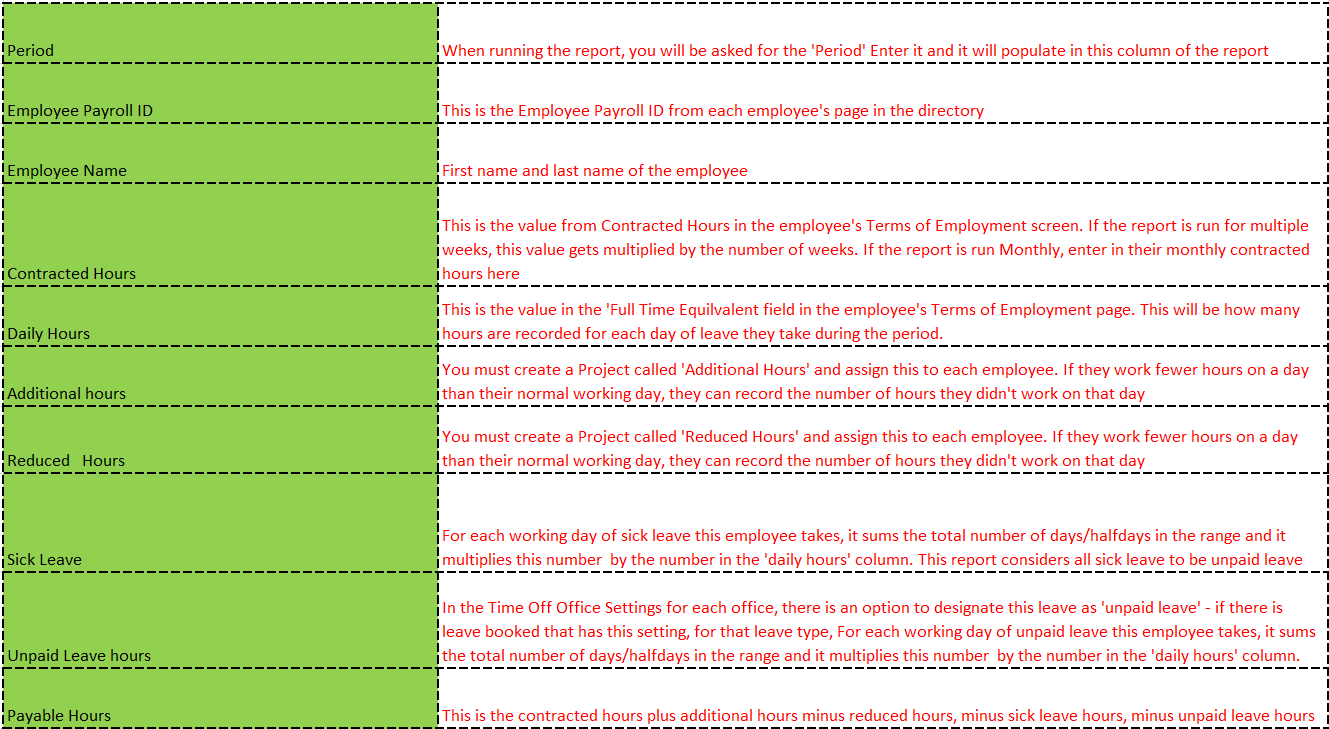
Each employee needs to have their Payroll Number entered in the directory in their 'Summary screen. They also need to have their standard working week, or monthly contracted hours populated in the directory. The Contracted Hours are entered in the Terms of Employment screen for each employee. They also need to have their standard working day entered into the 'Full Time Equivalent' field in the terms of employment screen. This will be used to deduct unpaid leave and sick leave from the payable hours for payroll.
To access these screens, simply click on the employee's name in the directory, and toggle between the summary and terms of employment screens using the menu on the left.
Setting up the Projects
Projects are configured in the Time On section on HRLocker
As a manager or Admin, click on Time On on the black ribbon
Click on the Projects Tab
Click Add new Project

Two new Projects need to be created and assigned to each employee who will be included in this report. One for 'Additional Hours' and one for 'Reduced Hours'
Completing and approving timesheets
The report will only populate data for additional or reduced hours if the report is at Approved Status. Before running payroll, it is a good idea to check the Unsubmitted and Awaiting approval tabs in the time on section for the relevant dates to ensure that all timesheets have been approved. If an employee is on leave for the full reporting period, their timesheets do not need to be completed for this report as they are unlikely to have any additional or reduced payable hours while they are on leave.
Each employee can complete and submit their own timesheets each week, or you can configure HRLocker to allow timesheets to be submitted and approved by their manager (this is an option in the time on-office settings.
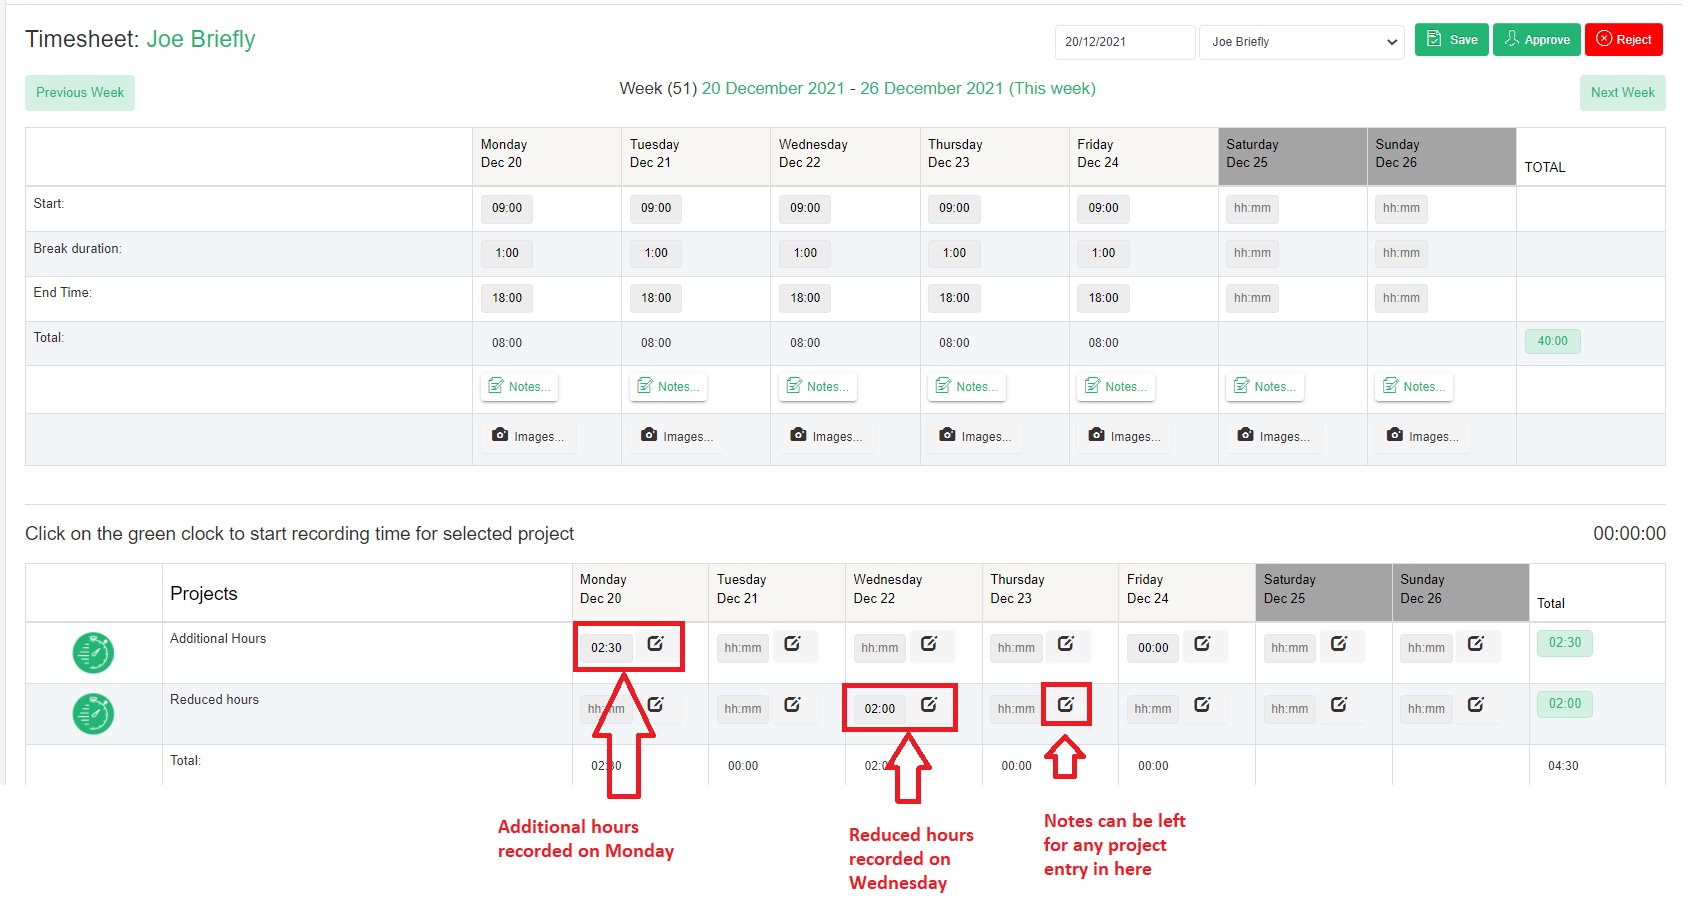
The times on the timesheets are not relevant to this report, only the two projects, 'Additional hours', or 'Reduced hours' are included
If an employee works more hours than their standard working day they can record this time in the Additional hours Project for that day. Alternatively, a manager can record this for them
If an employee works fewer hours than their standard working day they can record this time in the Additional hours Project for that day. Alternatively, a manager can record this for them
Unpaid Leave and Sick Leave
For this report. All Sick leave is considered to be unpaid leave and it is deducted from the payable hours for that period.
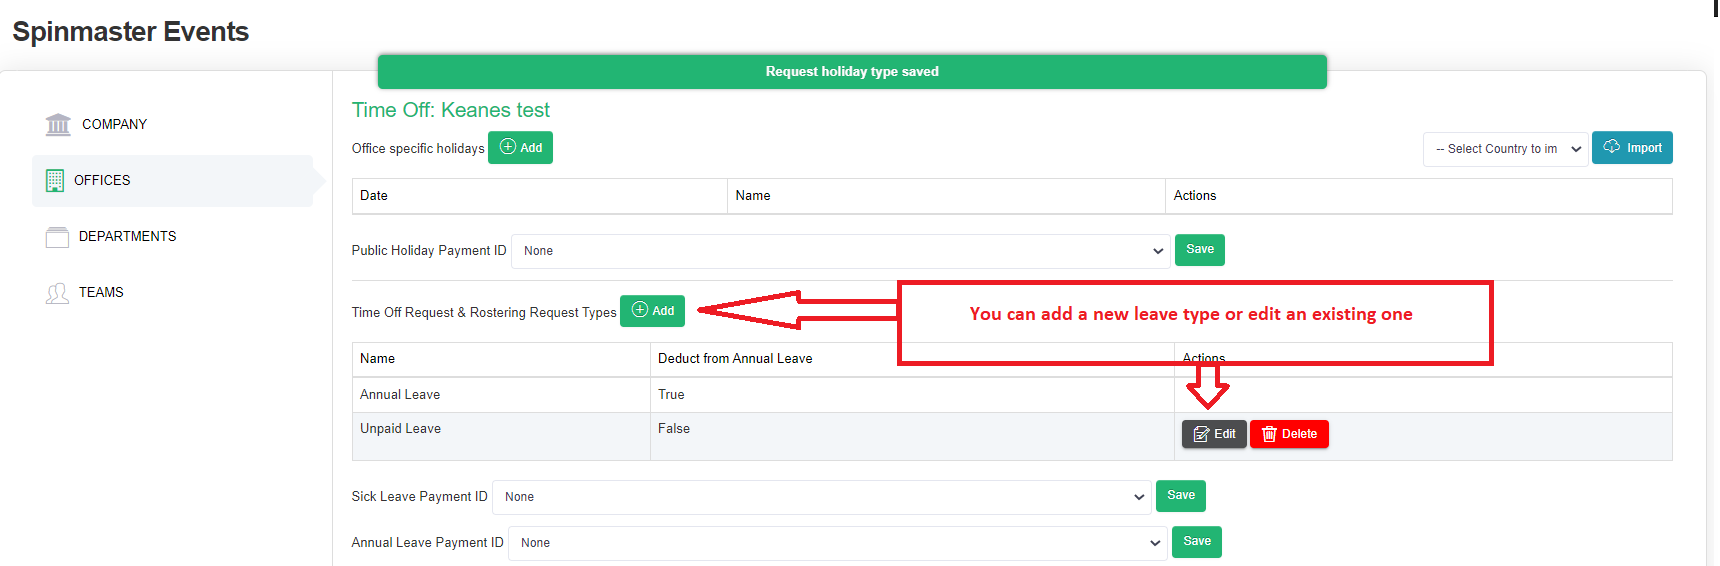
Because annual leave is paid leave, it is ignored by the report, but other leave types can be designated as 'Unpaid Leave'. If the leave type is designated unpaid leave, then it will be populated in the report and deducted from the payable hours for that reporting period.
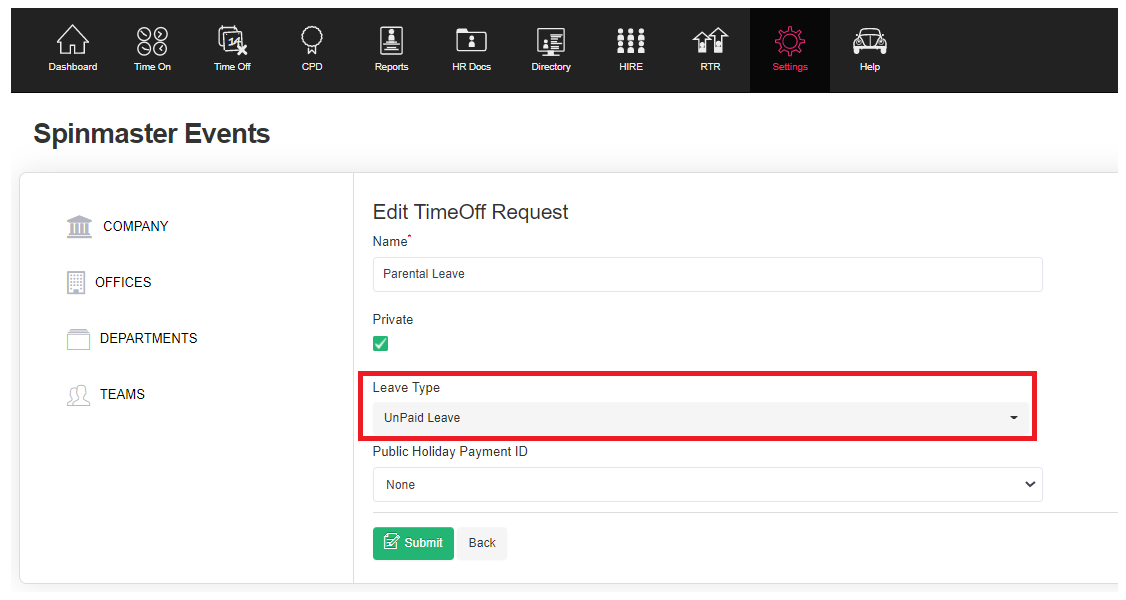
To set a leave type as 'Unpaid Leave' we need to edit or create the leave type in the time-off office settings
Running the report
To run the report you must have appropriate permissions on HRLocker
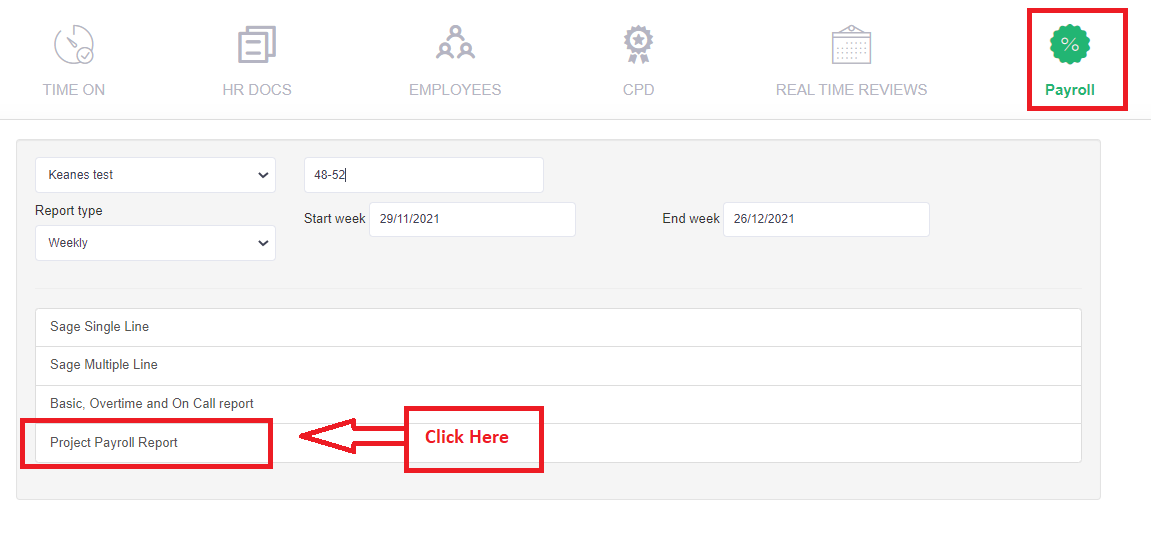
Click on Reports on the black ribbon
Click on the Payroll Icon
Select the office to run the report for.
Enter the Period
Choose either Weekly or Monthly report
Select the month or the start and end week
Click on the Project Payroll Report button and the report should download in your browser after a few seconds
Report Details
The Columns for this report are in green below, and the explanations for how each column is populated are below