Managing timesheets effectively is crucial for maintaining accurate employee time records. In HRLocker, timesheets are disabled by default for new employees. Here's a guide on how to enable or disable timesheets for an employee, along with configuring specific settings.
Enabling Timesheets for an Employee
-
Access Employee Directory:
- Log in to HRLocker as an Admin or Manager with appropriate permissions.
- Navigate to the employee’s directory and select the relevant employee.
-
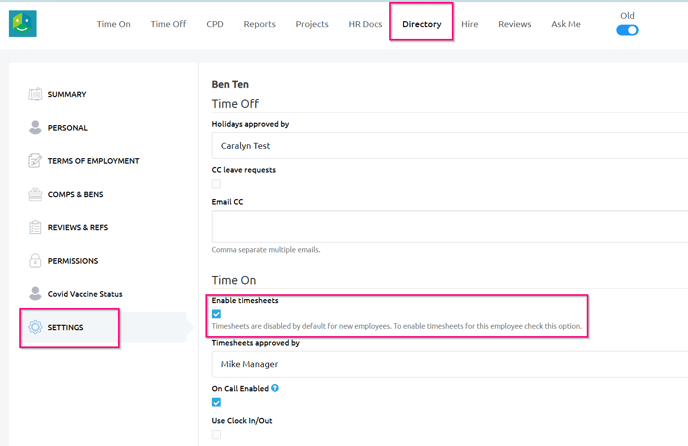
Open Settings:
- Go to the employee’s settings to manage their timesheet options.
-
Enable Timesheets:
- Check the box to enable timesheets. This will activate the timesheet functionality for the employee.
-
Set Time On Manager:
- Select the employee's "Time On" manager. This is the manager who will be responsible for approving the employee's timesheets.
-
Configure Timesheet Settings:
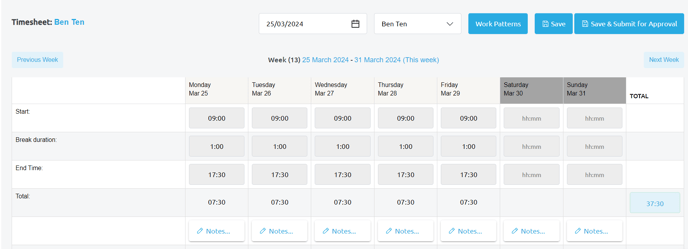
- Prepopulated Timesheets: If the employee is not clocking in/out, timesheets will be prepopulated with their work pattern hours.
- Start with Blank Timesheet: If you prefer the timesheets to start blank, check this option.
- Use Clock In/Out: For employees who will be clocking in and out, enable this setting.
-
Additional Clock In/Out Options:
- Tablet Only: Only allow the employee to clock in/out from the tablet, preventing use of the Time On app or HRLocker website.
- Track Geolocation: Enable this to track the employee’s location when they clock in/out.
- Restrict by IP Address: Enter the IP addresses from which the employee is allowed to clock in.
- Create PIN: Set up a PIN number if the employee will be using a tablet for clocking in/out.
Disabling Timesheets for an Employee
-
Navigate to Employee Settings:
- Access the same settings page where you enabled timesheets.
-
Disable Timesheets:
- Untick 'Enable Timesheets' to turn off the timesheet functionality for the employee.
Auto-Populate Timesheets with Leave Hours
-
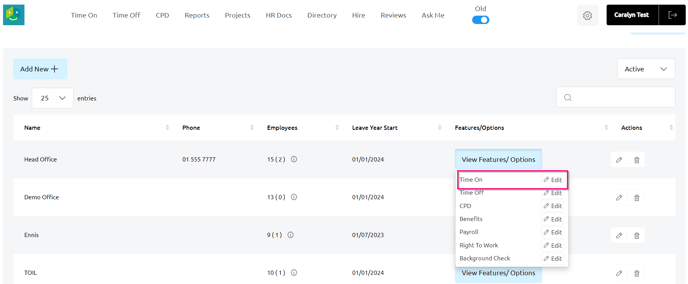
Navigate to Office Time On Settings:
- This setting is managed at the office level, not individually for each employee.
-
Configure Leave Hours on Timesheets:
-
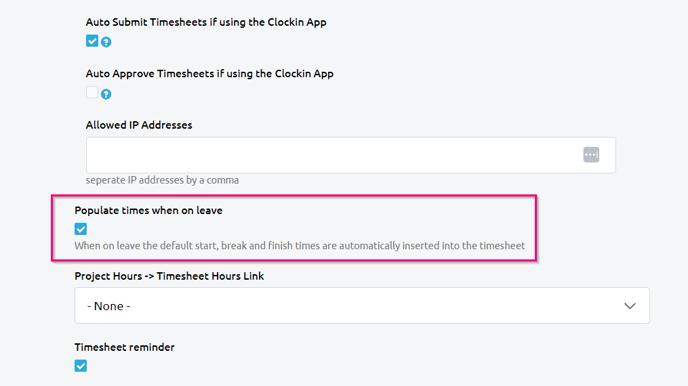
- Populate Times When on Leave: Enable this setting if you want the timesheet to automatically fill in the work pattern hours for the duration of an approved leave.
- Leave Days Blank When on Leave: Disable the above setting if you prefer to leave the timesheet days blank when an employee is on leave.
Configuring timesheets in HRLocker allows for flexibility in how time is recorded and managed within your organization. By setting up timesheets according to specific needs, you can ensure accurate tracking of work hours. For additional support or information, please contact HRLocker support.